
| 일 | 월 | 화 | 수 | 목 | 금 | 토 |
|---|---|---|---|---|---|---|
| 1 | 2 | 3 | ||||
| 4 | 5 | 6 | 7 | 8 | 9 | 10 |
| 11 | 12 | 13 | 14 | 15 | 16 | 17 |
| 18 | 19 | 20 | 21 | 22 | 23 | 24 |
| 25 | 26 | 27 | 28 | 29 | 30 | 31 |
Tags
- node.js
- Mac
- dbeaver
- devlog
- programmers
- svn
- STS
- html
- windows
- Java
- shorturl
- 정보처리기사
- my sql
- js
- TIP
- mysql
- Oracle
- SQL
- jquery
- Linux
- urlshortner
- mybatis
- spring
- reCAPTCHA
- Eclipse
- SQL Server
- Tomcat
- maria db
- javascript
- IntelliJ
Archives
- Today
- Total
고양의 성장일기
[Spring] Fetch API로 사용자 정보 일치 여부 확인하기 (feat. 403 Error) 본문
⚙️ Back-End/Spring Framework
[Spring] Fetch API로 사용자 정보 일치 여부 확인하기 (feat. 403 Error)
고 양 2023. 9. 8. 11:42반응형
Fetch API로 사용자 정보 일치 여부 확인하기 (feat. 403 Error)
비밀번호를 입력받아 실시간으로 사용자의 비밀번호와 일치하는지 검사하는 로직을 구현해 봤습니다.
사용 언어 및 개발환경은 Java 17, Spring boot 3, Spring security, JPA입니다.
Spring Security 로그인 인증 관련 403 Error가 발생해 해결 내용도 함께 작성합니다.😊
Controller
- @PostMapping("/password/check") : 보안의 이점을 가지기 위해 Post 방식으로 데이터를 받습니다.
- @PreAuthorize("isAuthenticated()") : 인증된 사용자만 해당 URL에 접근할 수 있게 하기 위해 적용했습니다.
- @ResponseBody : boolean 값을 Model에 직접 넘겨주기 위해 애너테이션을 적용했습니다.
- 인증정보(Principal 객체)와 비밀번호를 매개변수로 서비스의 메서드를 호출하고 boolean 값을 리턴합니다. (설레네요 ㅠㅠ)
@PostMapping("/user/password/check")
@PreAuthorize("isAuthenticated()")
@ResponseBody
public boolean isPasswordMatching(Principal principal, @RequestParam String password) {
    return this.userService.isPasswordMatching(principal, password);
}
Service
- 인증정보와 비밀번호를 넘겨받아 DB에 저장된 사용자 정보를 가져오고 비밀번호 일치여부를 판단합니다.
public boolean isPasswordMatching(Principal principal, String password) {
    if (principal == null || principal.getName() == null) {
        throw new IllegalArgumentException("Invalid principal");
    }

    Optional<SiteUser> userOptional  = this.userRepository.findByusername(principal.getName());

    if (!userOptional .isPresent()) {
        throw new DataNotFoundException("User not found.");
    }

    SiteUser user = userOptional.get();
    String storedPassword = user.getPassword();

    return passwordEncoder.matches(password, storedPassword);
}
Template
- 현재 사용 중인 비밀번호를 입력받을 input 요소입니다.
<div class="mb-3">
    <label for="currentPassword" class="form-label">Current password</label>
    <input type="password" class="form-control currentPassword">
</div>
Javascript
- 여러 개의 input 요소를 querySelectorAll 메서드를 이용해 모두 가져옵니다.
- forEach문을 활용해서 각각의 요소에 EventListener를 붙여줬습니다.
- input 창에 입력을 할 때마다 위에 작성한 Controller의 메서드를 호출해 결괏값을 리턴 받아 요소에 표시해 줍니다.
document.addEventListener("DOMContentLoaded", function() {
    const passwordInputs = document.querySelectorAll(".currentPassword");

    passwordInputs.forEach(input => {
        input.addEventListener("input", function() {
            const password = input.value;

            fetch("/user/password/check", {
                method: "POST",
                headers: {
                    "Content-Type": "application/x-www-form-urlencoded",
                },
                body: `password=${encodeURIComponent(password)}`
            })
            .then(response => response.json())
            .then(data => {
                if (data === true) {
                    input.classList.add("border-success");
                    input.classList.remove("border-danger");
                } else {
                    input.classList.add("border-danger");
                    input.classList.remove("border-success");
                }
            })
            .catch(error => {
                console.error("Error:", error);
            });
        });
    });
});
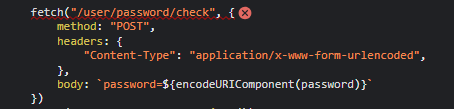
여기까지 작성했을 때 로직상으로 아무 문제도 없었지만 콘솔창에는 403 에러가 발생했습니다.


콘솔을 뜯어보면 아래와 같이 fetch 요청을 보내는 부분에서 에러가 발생하고 있었습니다.
그래서 방법이 있을 것 아니에요
Spring Security에서 CSRF 방어를 위해서 CSRF 토큰을 사용하는 경우
이렇게 요청을 보낼 때 CSRF 토큰을 포함해야 한다고 합니다.
Security Configuration에서 CSRF를 사용하지 않도록 설정하는 방법도 있었지만
보안상 불리한 경우가 생길 수 있을 것 같아서 토큰을 포함하는 방법으로 해결했습니다.
Template
- head 태그 내부에 CSRF 토큰 정보를 포함시켜 줍니다.
<head>
	<meta charset="utf-8">
	<meta name="viewport" content="width=device-width, initial-scale=1, shrink-to-fit=no">
	<meta name="_csrf" th:content="${_csrf.token}">
	<meta name="_csrf_header" th:content="${_csrf.headerName}">
	<link rel="stylesheet" type="text/css" th:href="@{/style.css}">
	<link rel="stylesheet" type="text/css" th:href="@{/bootstrap.min.css}">
</head>
Javascript
- 요청 시 토큰 값을 header에 담아줍니다.
document.addEventListener("DOMContentLoaded", function() {
    const passwordInputs = document.querySelectorAll(".currentPassword");

    passwordInputs.forEach(input => {
        input.addEventListener("input", function() {
            const password = input.value;
            const csrfToken = document.querySelector("[name='_csrf']").getAttribute("content"); // CSRF 토큰 가져오기

            fetch("/user/password/check", {
                method: "POST",
                headers: {
                    "Content-Type": "application/x-www-form-urlencoded",
                    "X-CSRF-TOKEN": csrfToken // CSRF 토큰 추가
                },
                body: `password=${encodeURIComponent(password)}`
            })
            .then(response => response.json())
            .then(data => {
                if (data === true) {
                    input.classList.add("border-success");
                    input.classList.remove("border-danger");
                } else {
                    input.classList.add("border-danger");
                    input.classList.remove("border-success");
                }
            })
            .catch(error => {
                console.error("Error:", error);
            });
        });
    });
});
결과적으로 해결된 것 같습니다.

도움이 되어드렸다면 구독 / 좋아요 부탁드립니다.👏🏻
감사합니다.🙂
반응형
'⚙️ Back-End > Spring Framework' 카테고리의 다른 글
| [Spring] There is no getter for property named 'url' in 'class java.lang.String' (1) | 2025.03.11 |
|---|---|
| [Spring] 비동기로 화면에 뷰 템플릿 추가하기 (2) | 2024.12.13 |
| [Spring] 스프링부트에서 서버 재시작 없이 클래스 변경 사항 반영하기 (0) | 2023.09.08 |
| [Spring] BeanDefinitionStoreException이 발생하는 이유 (0) | 2023.09.08 |
| [Spring] Spring Tool Suite4 설치하기 (0) | 2023.09.08 |
'⚙️ Back-End/Spring Framework' Related Articles
more


